Difference between revisions of "Installing FIELDPRO"
(Created page with "Installing FIELDPRO File:Admin_Level.png Important Note: You MUST have Administrative Rights on the computer on which you are installing the software system in order to...") |
(→FIELDPRO Client) |
||
| (21 intermediate revisions by the same user not shown) | |||
| Line 1: | Line 1: | ||
| − | Installing FIELDPRO | + | ==Installing FIELDPRO== |
[[File:Admin_Level.png]] | [[File:Admin_Level.png]] | ||
| Line 5: | Line 5: | ||
Important Note: You MUST have Administrative Rights on the computer on which you are installing the software system in order to install the system drivers of the program to your Windows/System directory! For further information on the access rights you have on your computer, please consult your IT department. | Important Note: You MUST have Administrative Rights on the computer on which you are installing the software system in order to install the system drivers of the program to your Windows/System directory! For further information on the access rights you have on your computer, please consult your IT department. | ||
| + | ===FLexLM Server=== | ||
| + | *Download '''lmgrd.exe''', '''lmtools.exe''', '''resnet.exe''' programs | ||
| + | *Create a folder and put the files there. ''Note: it is not recommend to create subfolders inside this folder'' | ||
| + | *Run lmtools.exe and '''System Settings''' page locate Ethernet Address value | ||
| + | [[File:FlexLM1.png|center]] | ||
| + | *Send the value to resnet and receive a generated license file. | ||
| + | *Put the file within the same directory lmgrd.exe is located | ||
| + | *Run lmtools.exe and setup the server as below: | ||
| − | + | [[File:FlexLMSetup.webm|center|800px]] | |
| + | ---- | ||
| − | + | ===FIELDPRO Client=== | |
| − | + | [[File:InstallingFieldproClientForLocalFlexLMServer.webm|center|800px]] | |
| + | Installation of the FIELDPRO Client, the FIELDPRO System or any other associated FIELDPRO application is straightforward: | ||
| − | + | *Download and run installation msi package | |
| − | + | *Click Next | |
| − | + | *Click Typical | |
| − | + | **If you have USB key - select option 1 | |
| − | + | **If you run with the network license - select option 2 and choose server name where the FlexLM server is located. In can FlexLM server is located on the machine Fieldpro Client being installed - enter '''localhost''' | |
| − | + | **If you have a local FlexLM license file - selection option 3 and choose this file | |
| − | + | *Click Install | |
| − | + | *Wait for the progress to finish | |
| − | + | *Click Finish | |
| − | |||
| − | |||
| − | |||
| − | If you | ||
| − | |||
| − | |||
| − | |||
| − | |||
| − | |||
| − | |||
| + | ---- | ||
| − | + | ===Install SQL Server=== | |
| + | Example provided uses SQL Server 2014 | ||
| − | + | *Download installation files. | |
| + | *Locate '''setup.exe'''. Run it and follow the instructions below: | ||
| + | [[File:SQL2014_1.png|center]] | ||
| + | [[File:SQL2014_2.png|center]] | ||
| + | [[File:SQL2014_3.png|center]] | ||
| + | [[File:SQL2014_4.png|center]] | ||
| + | [[File:SQL2014_5.png|center]] | ||
| + | [[File:SQL2014_6.png|center]] | ||
| + | [[File:SQL2014_7.png|center]] | ||
| + | [[File:SQL2014_8.png|center]] | ||
| + | [[File:SQL2014_9.png|center]] | ||
| + | [[File:SQL2014_10.png|center]] | ||
| + | [[File:SQL2014_11.png|center]] | ||
| + | [[File:SQL2014_12.png|center]] | ||
| + | [[File:SQL2014_13.png|center]] | ||
| + | ---- | ||
| − | + | ===Install Fieldpro DEMO SQL Database=== | |
| + | *Download FIELDPRO_DEMO_DB_MSSQL_xxxx.msi file (xxxx here is the version number) | ||
| + | *Run it and follows instructions below (note you will need administrative privileges to run it): | ||
| + | [[File:demo1.png|center]] | ||
| + | [[File:demo2.png|center]] | ||
| + | [[File:demo3.png|center]] | ||
| + | [[File:demo3.png|center]] | ||
| + | ---- | ||
| − | + | ===Setup IIS=== | |
| + | *Open '''Programs and Features''' | ||
| + | *Click "Turn Windows Features on or off" | ||
| + | *Setup Internet Information Services as on the picture below: | ||
| + | [[File:IIS.png|center]] | ||
| − | |||
| − | + | {{#evt:service=youtube|id=https://www.youtube.com/watch?v=_hoiSdn5rIY&t=69|alignment=center}} | |
| + | ---- | ||
| − | [[File: | + | ===Install eFieldpro=== |
| + | *Download installation package | ||
| + | *Run it and follow the instructions below: | ||
| + | [[File:efieldpro1.png|center]] | ||
| + | [[File:efieldpro2.png|center]] | ||
| + | [[File:efieldpro3.png|center]] | ||
| + | [[File:efieldpro4.png|center]] | ||
| + | [[File:efieldpro5.png|center]] | ||
| + | [[File:efieldpro6.png|center]] | ||
| − | + | Note: all settings are default setting related to installation sample instruction above. | |
| + | ---- | ||
Latest revision as of 10:18, 12 June 2018
Contents
Installing FIELDPRO
Important Note: You MUST have Administrative Rights on the computer on which you are installing the software system in order to install the system drivers of the program to your Windows/System directory! For further information on the access rights you have on your computer, please consult your IT department.
FLexLM Server
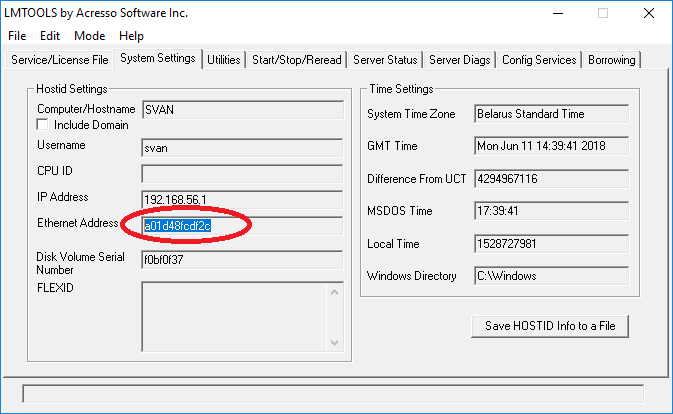
- Download lmgrd.exe, lmtools.exe, resnet.exe programs
- Create a folder and put the files there. Note: it is not recommend to create subfolders inside this folder
- Run lmtools.exe and System Settings page locate Ethernet Address value
- Send the value to resnet and receive a generated license file.
- Put the file within the same directory lmgrd.exe is located
- Run lmtools.exe and setup the server as below:
FIELDPRO Client
Installation of the FIELDPRO Client, the FIELDPRO System or any other associated FIELDPRO application is straightforward:
- Download and run installation msi package
- Click Next
- Click Typical
- If you have USB key - select option 1
- If you run with the network license - select option 2 and choose server name where the FlexLM server is located. In can FlexLM server is located on the machine Fieldpro Client being installed - enter localhost
- If you have a local FlexLM license file - selection option 3 and choose this file
- Click Install
- Wait for the progress to finish
- Click Finish
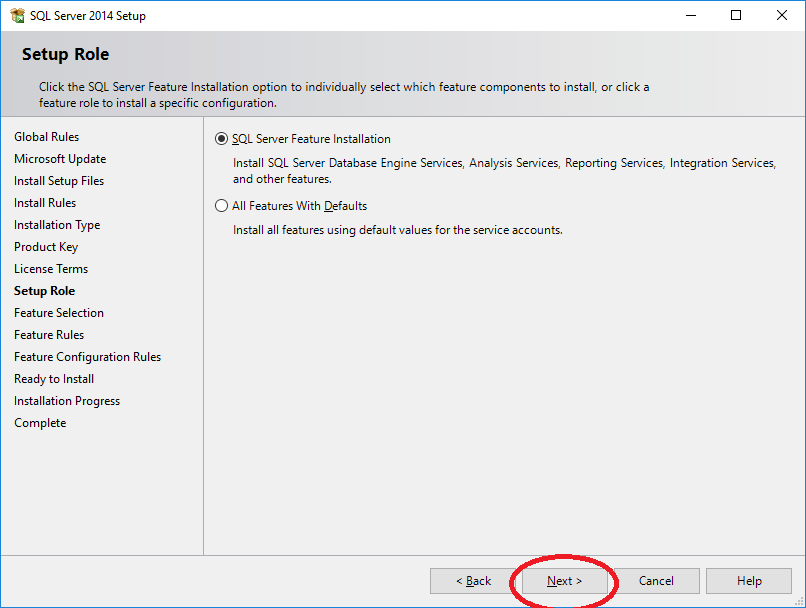
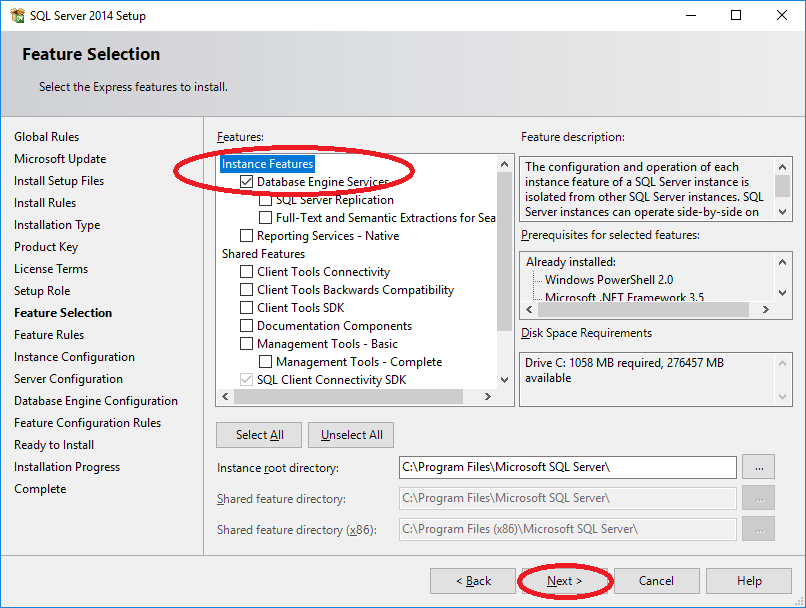
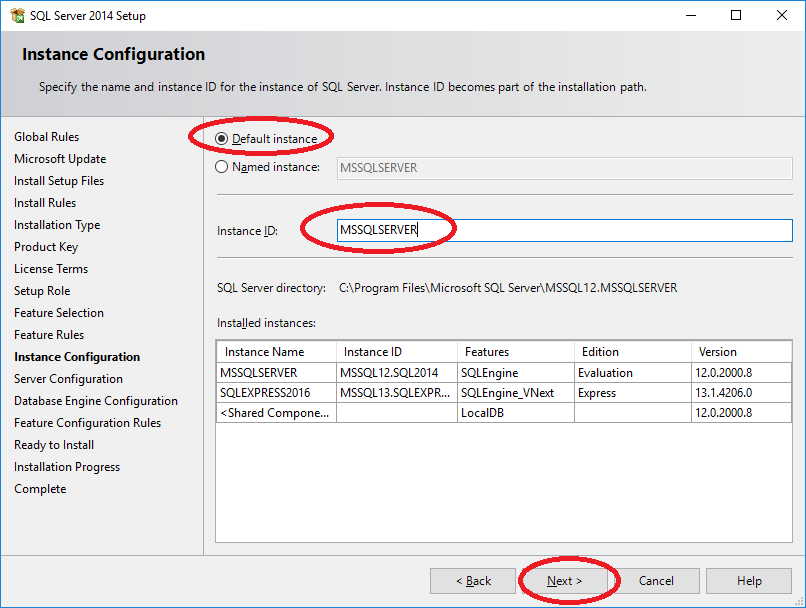
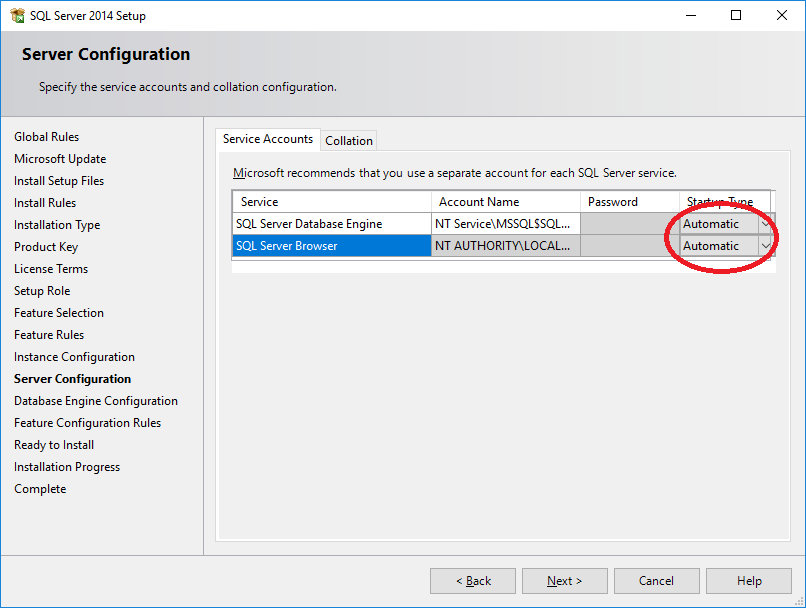
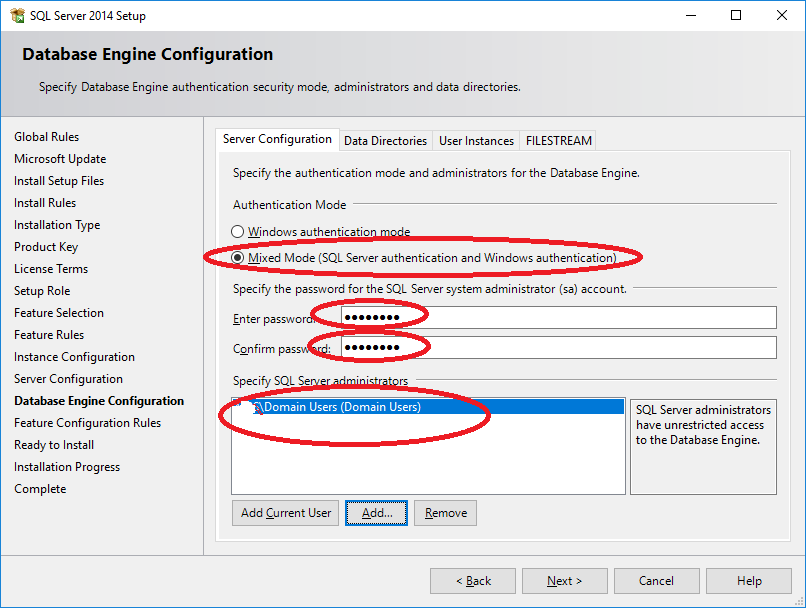
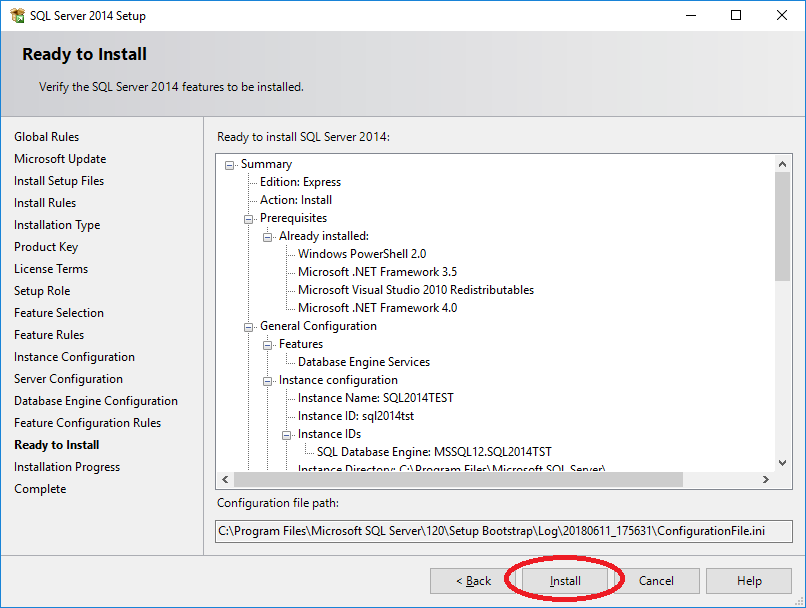
Install SQL Server
Example provided uses SQL Server 2014
- Download installation files.
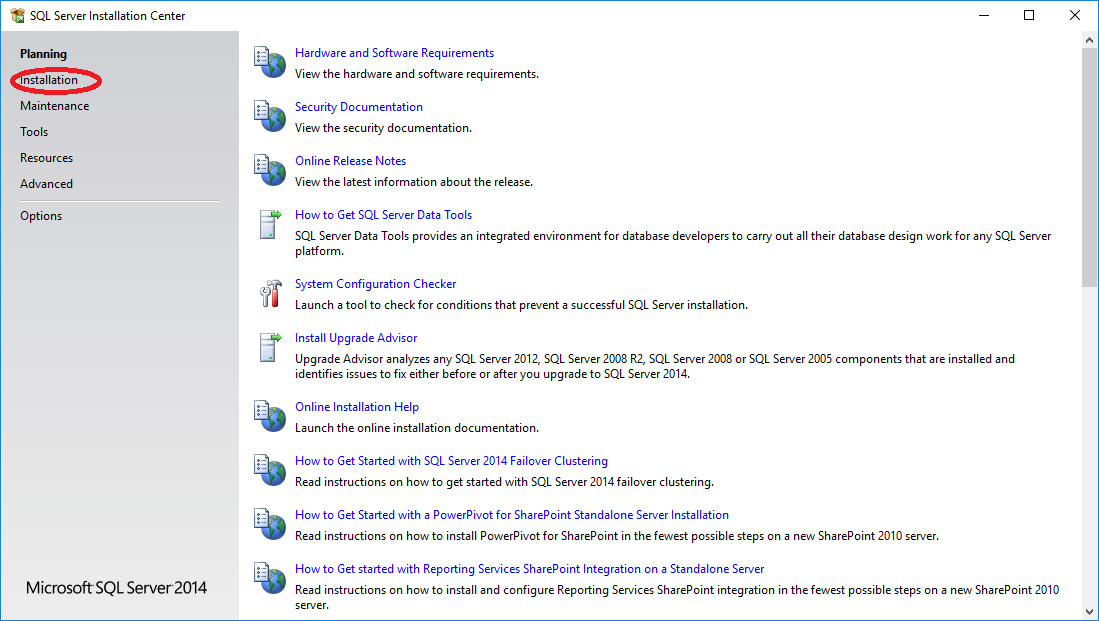
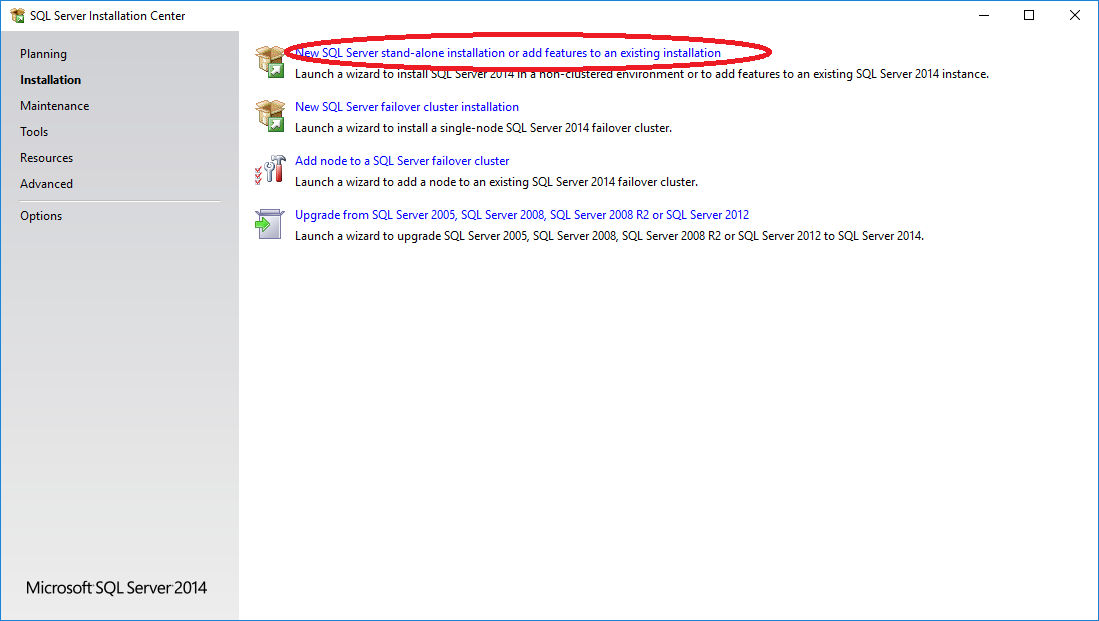
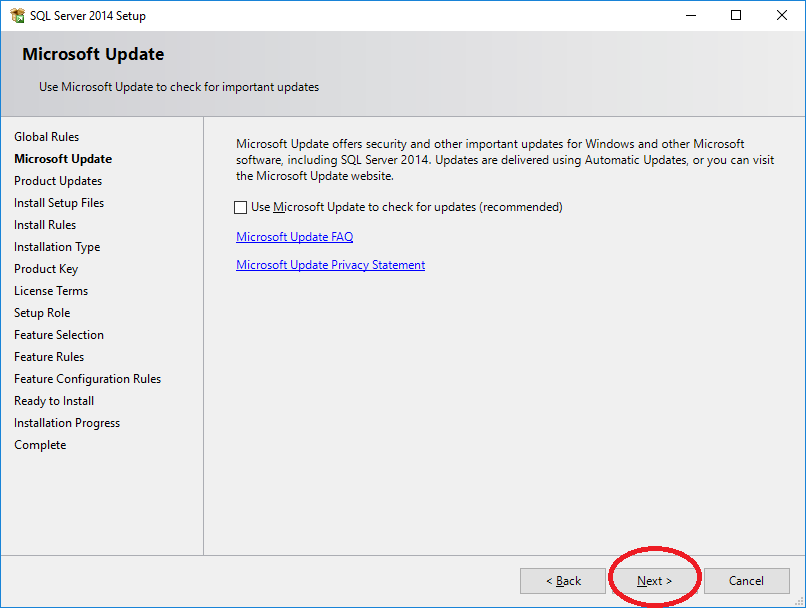
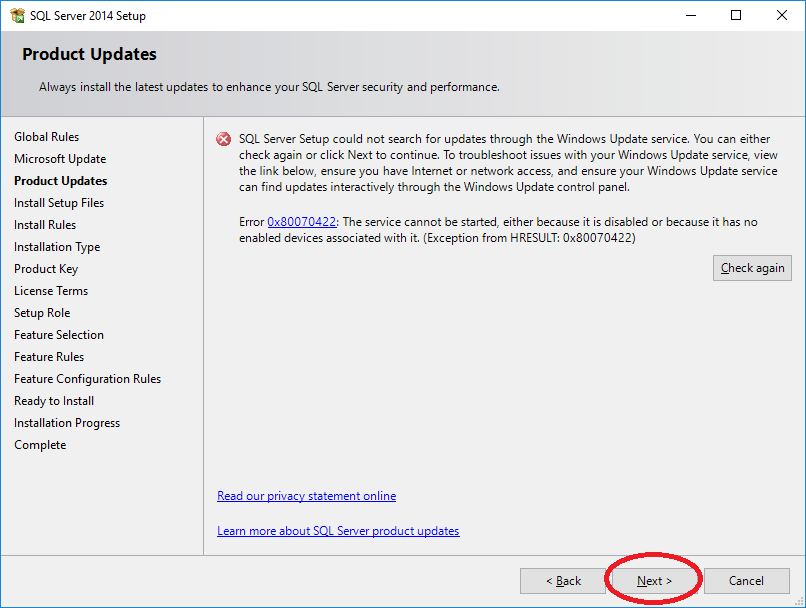
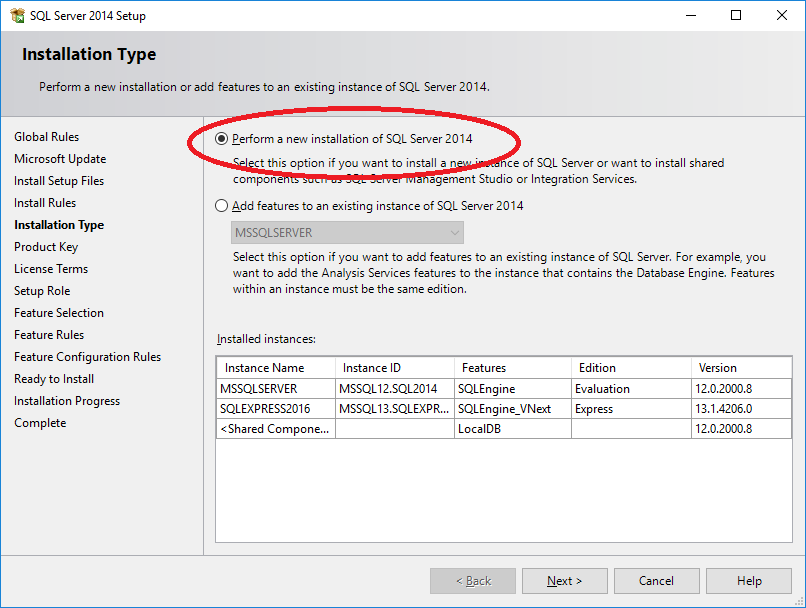
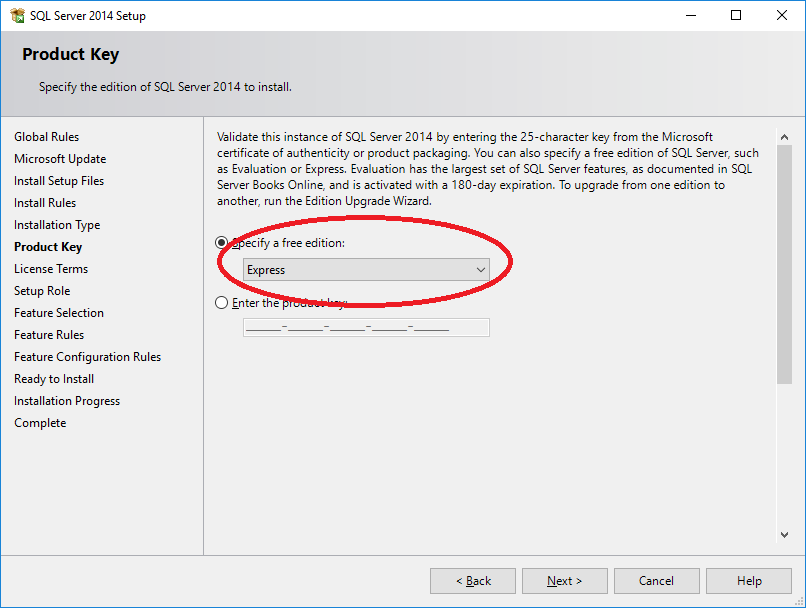
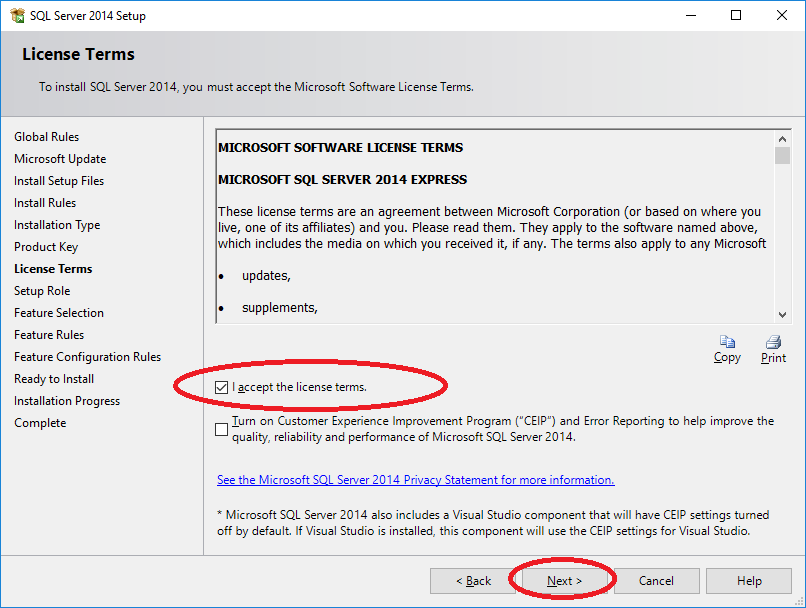
- Locate setup.exe. Run it and follow the instructions below:
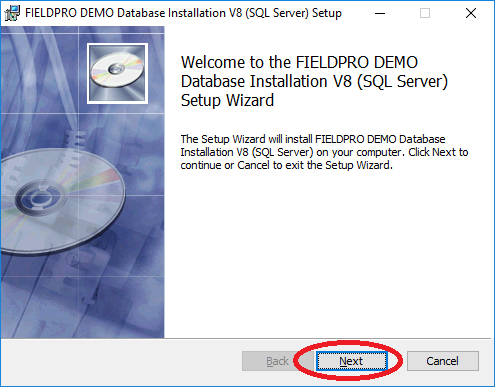
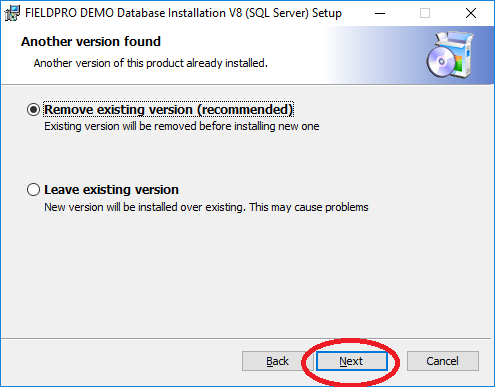
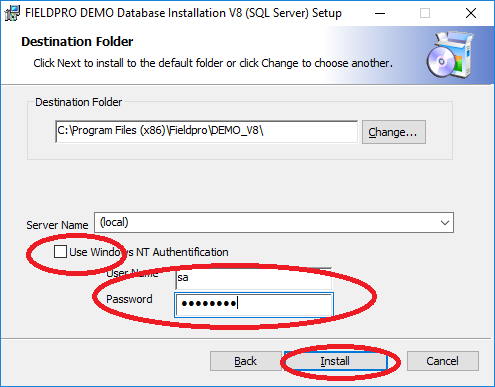
Install Fieldpro DEMO SQL Database
- Download FIELDPRO_DEMO_DB_MSSQL_xxxx.msi file (xxxx here is the version number)
- Run it and follows instructions below (note you will need administrative privileges to run it):
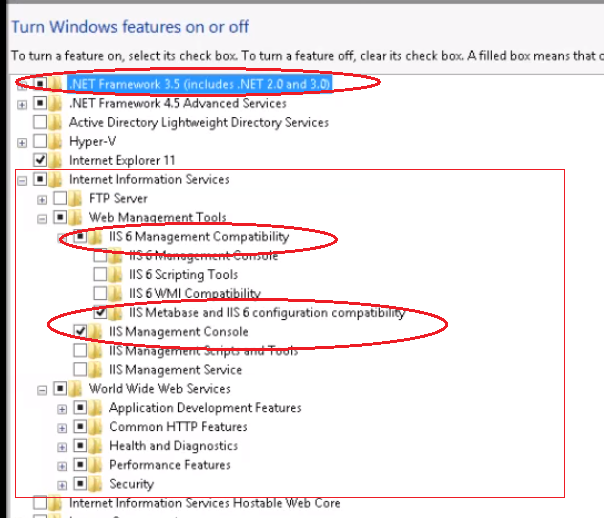
Setup IIS
- Open Programs and Features
- Click "Turn Windows Features on or off"
- Setup Internet Information Services as on the picture below:
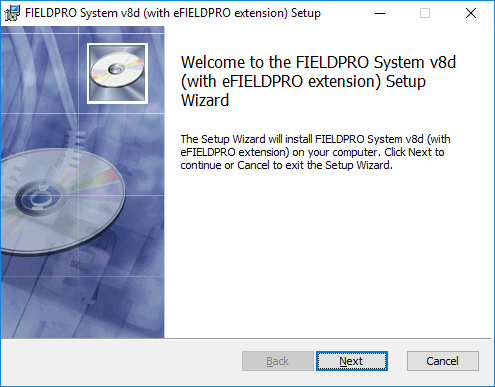
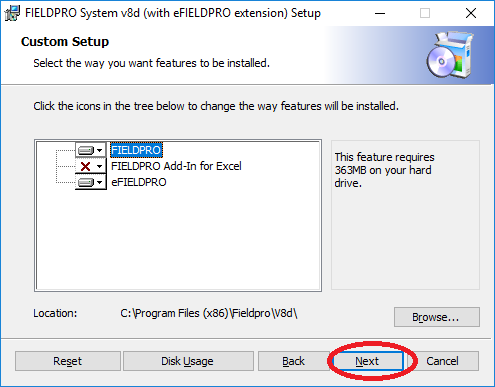
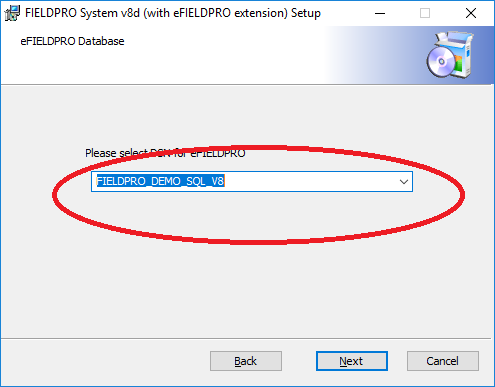
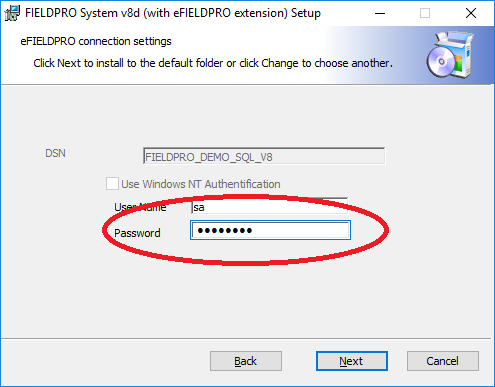
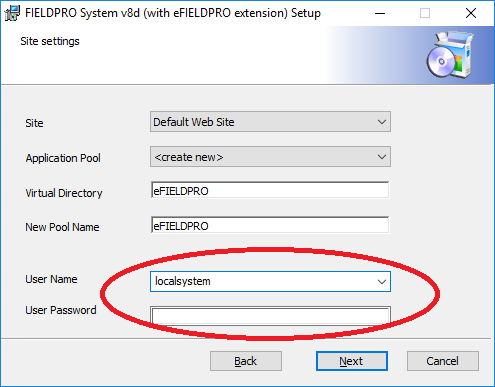
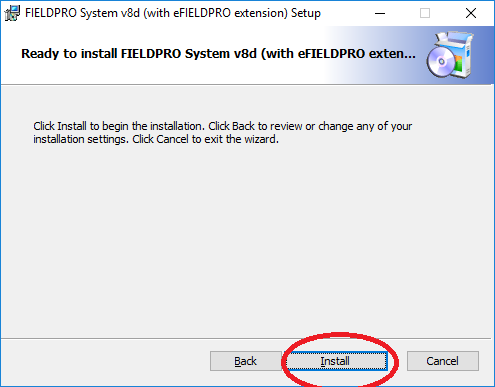
Install eFieldpro
- Download installation package
- Run it and follow the instructions below:
Note: all settings are default setting related to installation sample instruction above.
